How to do Selective coloring with Pixelmator on iOS
I originally did this edit using Pixelmator on my Mac. But that was back then when I still used a DSLR to shoot and a laptop to edit my photos. Once I made the transition to iPhone only photography - and the Pixelmator Team released Pixelmator for iOS - I re-edited this photo using my iPad to learn the basics of Pixelmator for iOS.
There are quite a number of ways how you could create the selective coloring effect in Pixelmator. I found this to be the most easy way for this photo:
- Create a second layer from the original photo
- Apply a devilish red/orange tone to the full image on the second layer
- Create a mask on the first layer so the eyes of the second layer become visible from the second layer
- Convert the first layer to black an white
Selective coloring can be done with Pixelmator on your iPhone or iPad in less then 5 minutes. So open a photo of an owl (any other wild animal will work, too ;) and let’s get started
Create a second layer from the original photo in Pixelmator
To be able to duplicate a layer in Pixelmator you need to display the layer pane. To do so, swipe in from the left edge of the screen towards the center and the layer pane will be displayed.

The layer pane will contain a single layer with the photo you’ve just opened.
Now tap the photo in the layer pane once and you’ll see a menu appear. In the menu tap duplicate.

We’ll start working on the second layer, so we will hide the first layer. Tap the first layer again and select Hide in the menu.
Apply a devilish red/orange tone
Now we need to apply the devilish red/orange tone to the second layer. As we’re working with two layers, we can apply the tone to the entire photo. We’ll use a mask on the first layer later to make only the eyes of the second layer visible.
To apply the red/orange tone:
- Tap the paint icon in the upper right corner of the screen. A menu will appear
- In the menu select Adjust Colors. The color pane will appear at the bottom of the screen.
- Swipe left over the color pane until you see the section containing the red, green and blue values

To get that tone, I increased the red value quite a bit, reduced the green and slightly reduced the blue channel. Have a look at the above screenshot to see the adjustments.
Create a mask on the first layer
Now show the first layer again. Tap the hidden first layer once and a menu will appear again. Tap show and the first layer will become visible. Note that the first layer now hides the second layer to which we’ve applied the red/orange tone. So basically you’ll see the original photo again without the tone adjustments you just made.
Now we need to create a mask on the first layer for the eyes of the owl. In other words, we’ll basically erase the eyes on the first layer and the devilish red/oranger eyes of the second layer will shine through.
Make sure the first layer is selected and has a blue square around it. Now tap the paint icon in the upper right corner of the screen again and select Paint and Erase in the menu.
At the top of the screen you’ll now see three new menu items. On the left side it says either paint or erase and on the right side you’ll see the name of the brush followed by the size of the brush.
Now we ned to ensure that we’re in erase mode. If it says paint in the top left corner of the screen, you’re actually in erase mode. If it says erase you’re in paint mode. Yes, that is a little confusing. Tap either paint or erase once to toggle between the two modes and make sure it says paint.
Once you’re in erase mode, tap the brush name that’s currently displayed and select soft eraser. Then tap the brush size and choose a small brush, e.g. 10-15.
Next zoom in on the eye by pinching out with two fingers. Zoom in as much as possible so the entire eye fills the screen. Start to paint with your finger on the orange part of the eye. You’ll see that the devilish red/orange part of the second layer starts to appear.

Once you’re done with one eye, swipe over to the other one and just paint over the orange area. Now you should have a photo like this:

Convert to Black and White
As the final step, you’ll learn how to convert the first layer to black and white in Pixelmator. As we’re only converting the first layer to black and white and because of the mask you’ve created, the eyes will stay colored. To convert a layer to black and white:
- Make sure the first layer is selected in the layer pane and has a blue square around it.
- In the toolbar at the top of the screen tap the paint icon. A menu will appear.
- Select Add Effects in the menu. An effects toolbar will appear at the bottom of the screen.
- Tap Black & White
- Select a black and white preset that suits your needs. I used Inky for this photo.
- Tap Apply at the top right corner of the screen.

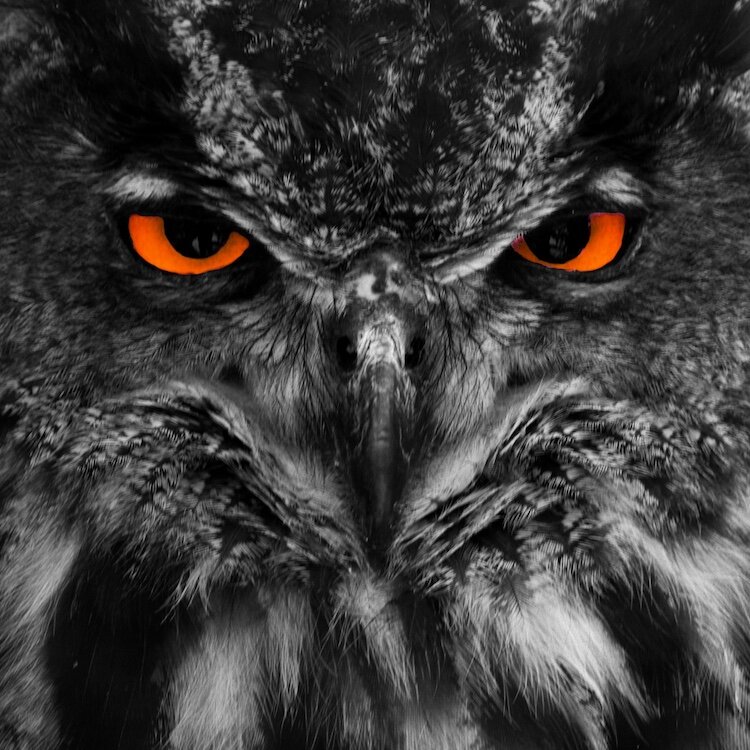
Voila, here’s the final „Bloodlined Eyes“ shot created in 5 minutes on an iPad.
Note that Pixelmator automatically saves your work. But if you want to save the photo to your camera roll or want to upload it to a photo sharing site, tap the share button in the upper right corner of the screen and select e.g. Save to Photos.

Update: If you own an iPad that supports Apple Pencil it’s definitely worth to get an Apple Pencil for such edits. With Apple Pencil you can work much more precise than with your finger.