iPhone Workflow Tutorial: "The Ghost Train"
The Ghost Train; (cc) by-nc squics.com.
This Friday I took a two hour photowalk in Vienna along the tracks of the Vienna metro and found a small bridge over the railway tracks. Standing in the middle of the small bridge, I experimented with long exposures using my iPhone. It took me a few attempts to get the timing right for the photo above. I call this shot (making eerie sounds) "The Ghost Train".
Apps and Gear used for "The Ghost Train" Photo
I try to use only few apps for all my iPhone photography. For this photo I used two apps, a Gorillapod and a remote shutter release:
- Slow Shutter Cam App to take the long exposure
- Lenslight App to add the headlights to the train.
- Muku Shuttr, a wireless remote shutter for Smartphones
- A Gorillapod for iPhone.
Slow Shutter Cam is one of my recommended iPhone camera apps. With this app, you can take a long exposure for capturing motion like flowing water, moving clouds or, a train.
While many camera apps are limited to an exposure of half a second, Slow Shutter Cam takes exposures of up to 60 seconds and longer. I've written a review of Slow Shutter Cam App which also explains how to use it and a few recommended settings.
With Lenslight app, you can add all sorts of light effects to photos right on the iPhone. I used it for this photo to add the headlights. I don't use Lenslight very often, but it get's updated frequently and is a great app for those looking to add special effects to their iPhone photos.
Finally, I converted the photo to black and white using the new photo editing functions in iOS8.
How I photographed the train to get the ghost effect
I mounted the iPhone to the bridge railing using the Joby Griptight Gorillapod, a special Gorillapod with a smartphone mount that works with almost all current smartphones.
To avoid camera shake and get a sharp picture despite the long exposure, I used Muku Shuttr, a wireless remote shutter release for Smartphones. It's small, uses bluetooth and works with all camera apps that support volume button shutter release. So make sure you've enabled that.

Settings for motion blur in Slow Shutter Cam App
In Slow Shutter Cam, I selected motion blur mode and set the blur strength to maximum. Then I made a wild guess about the capture duration I thought I'd need. After trying slight variations of the exposure time, I settled for one second. If I had used a longer exposure time, the railcar would have made its way through the entire frame and the result would have been something like a huge grey bar running through the entire photo.
I aimed the iPhone at the tracks and as soon as I saw the train entering the top of the viewfinder, I pressed the shutter release button on my Muku Shuttr, the wireless remote shutter I use.
If you use a remote shutter like Muku Shuttr with Slow Shutter Cam App, make sure to enable the hardware shutter option in the app, otherwise Muku Shuttr won't work.
Once Slow Shutter Cam finishes exposing the photo, it displays the photo and a toolbar with edit, clear and save. The trick for the ghost effect is hidden behind the edit option.
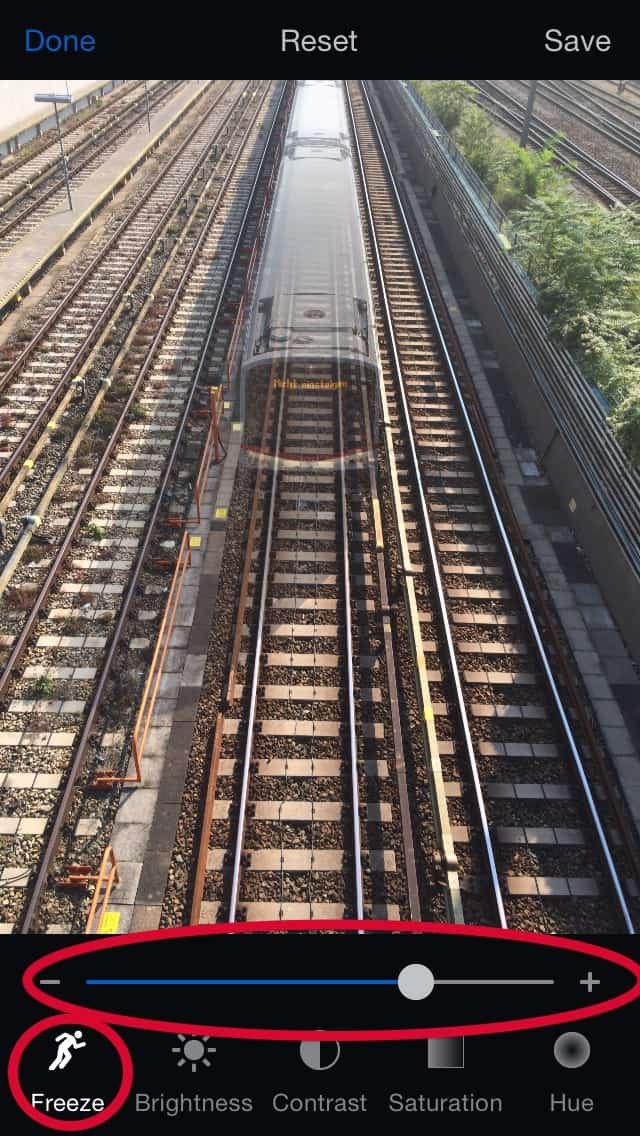
Adjusting the motion blur effect in Slow Shutter Cam App
After tapping edit, you can adjust the amount of motion blur (called freezing here) by tapping freeze. Move the freeze slider all to the left to see the photo at the beginning of the exposure. Move it to the right will display the photo towards the end of the exposure, creating the motion blur and ghost effect.
Don't forget to tap save once you're done with the freeze slider.
Adding the headlights
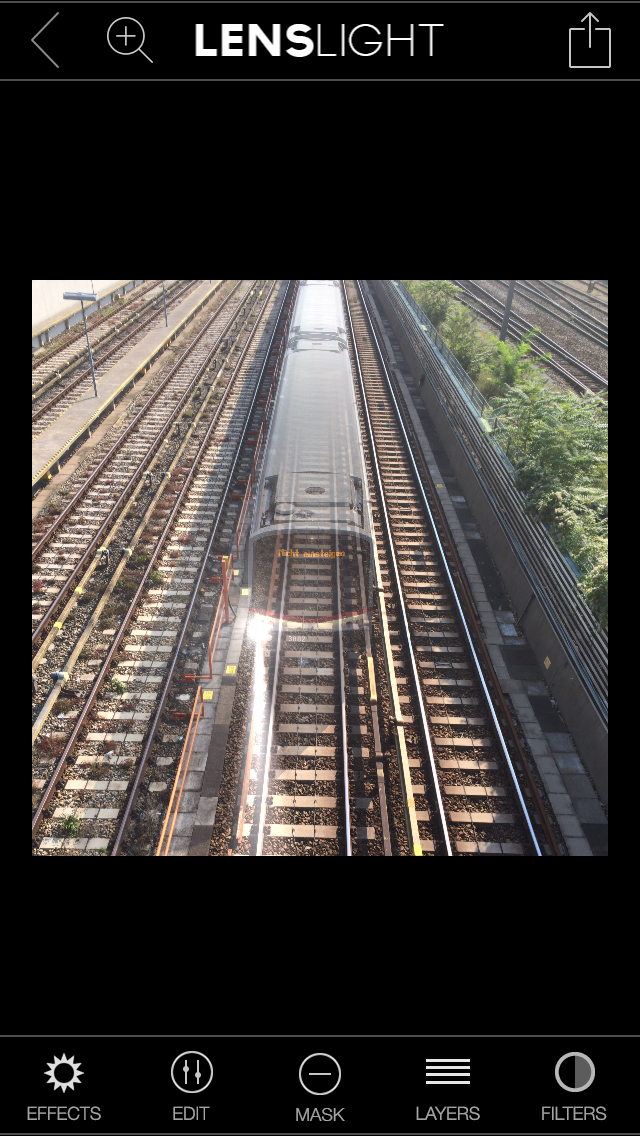
In Lenslight, you can add different kinds of light effects to a photo. Each light effect is added as a new layer that you can individually edit using familiar two finger pinch or rotate gestures. You can also set different parameters like brightness and color tone.
I used the search cone effect for this photo.

Each light effect is a single layer in Lenslight
To add a new search light, load the photo into Lenslight. Then tap layers followed by "+" of the first empty layer.
A new window will open displaying all kinds of awesome effects. Swipe to the left and locate the search light effect and tap it. It's added to the photo as a new layer.
To position the light effect properly, tap and drag the search light to the position you want it. Use a pinch gesture to resize the search light.
Each Layer (Light Effect) has an edit button that allows additional fine adjustments that you can use to make e.g. the light of the cone of the search light brighter, wider or smaller and you can even set a different color for the light.
First headlight added in Lenslight
For this photo I made the cone slightly smaller.
Then I repeated the above steps and added another search cone that I used as the second headlight for the train.
After you're done adding and positioning all the light effects, save the final photo to the camera roll by tapping the share symbol in the upper right corner.
From there, you can save your masterpiece to the camera roll.
Black and White Conversion with iOS8
I used the new adjustment functions in iOS8 to convert the photo to black and white.
Tap on the saved photo in the camera roll or all photos as it's called in iOS8. Then tap edit edit in the upper right corner. The new adjustments are hidden between the symbol that looks like a rotary knob. It's the third symbol from the left.

Converting the final photo to black and white with iOS8
Tap B&W and move the slider to convert the photo to black and white. For this photo, moving the slider to the right made it a little darker.
That's it. With two apps and a little practice you can create such photos in under 5 minutes.
Did you create any spooky ghost photos using this tutorial? Post them on Twitter or Instagram and tag me (@nocamerabag). I'd love to see them.
Summary
Slow Shutter Cam App is a great camera app for capturing long exposures on iPhone.
What makes this app worth buying is the possibility to edit and adjust the intensity and blur of the long exposure after you've taken it.
You can even take multiple long exposures in a single frame. I like to use this feature when photographing fireworks with iPhone.
If you'd like to know more, head over to my Slow Shutter Cam App review, buy Slow Shutter Cam from the App Store or check out other ways about how to take a long exposure on iPhone.